
How to Get the Film Look With Digital Video (Using Dehancer in DaVinci Resolve)
There’s a reason we still fall in love with the look of film. It’s not just the colors or the grain — it’s the feeling. The texture. The way a frame can hold a moment in time and make it feel alive.
In today’s world of ultra-clean digital cameras, getting that same emotional depth can be tricky. But thanks to film-emulation tools like Dehancer, you can bring that timeless cinematic look back — right inside DaVinci Resolve.
In this post, I’ll walk you through how to use Dehancer to create rich, film-like footage from your digital video.
🎞️ Why We Love the Film Look
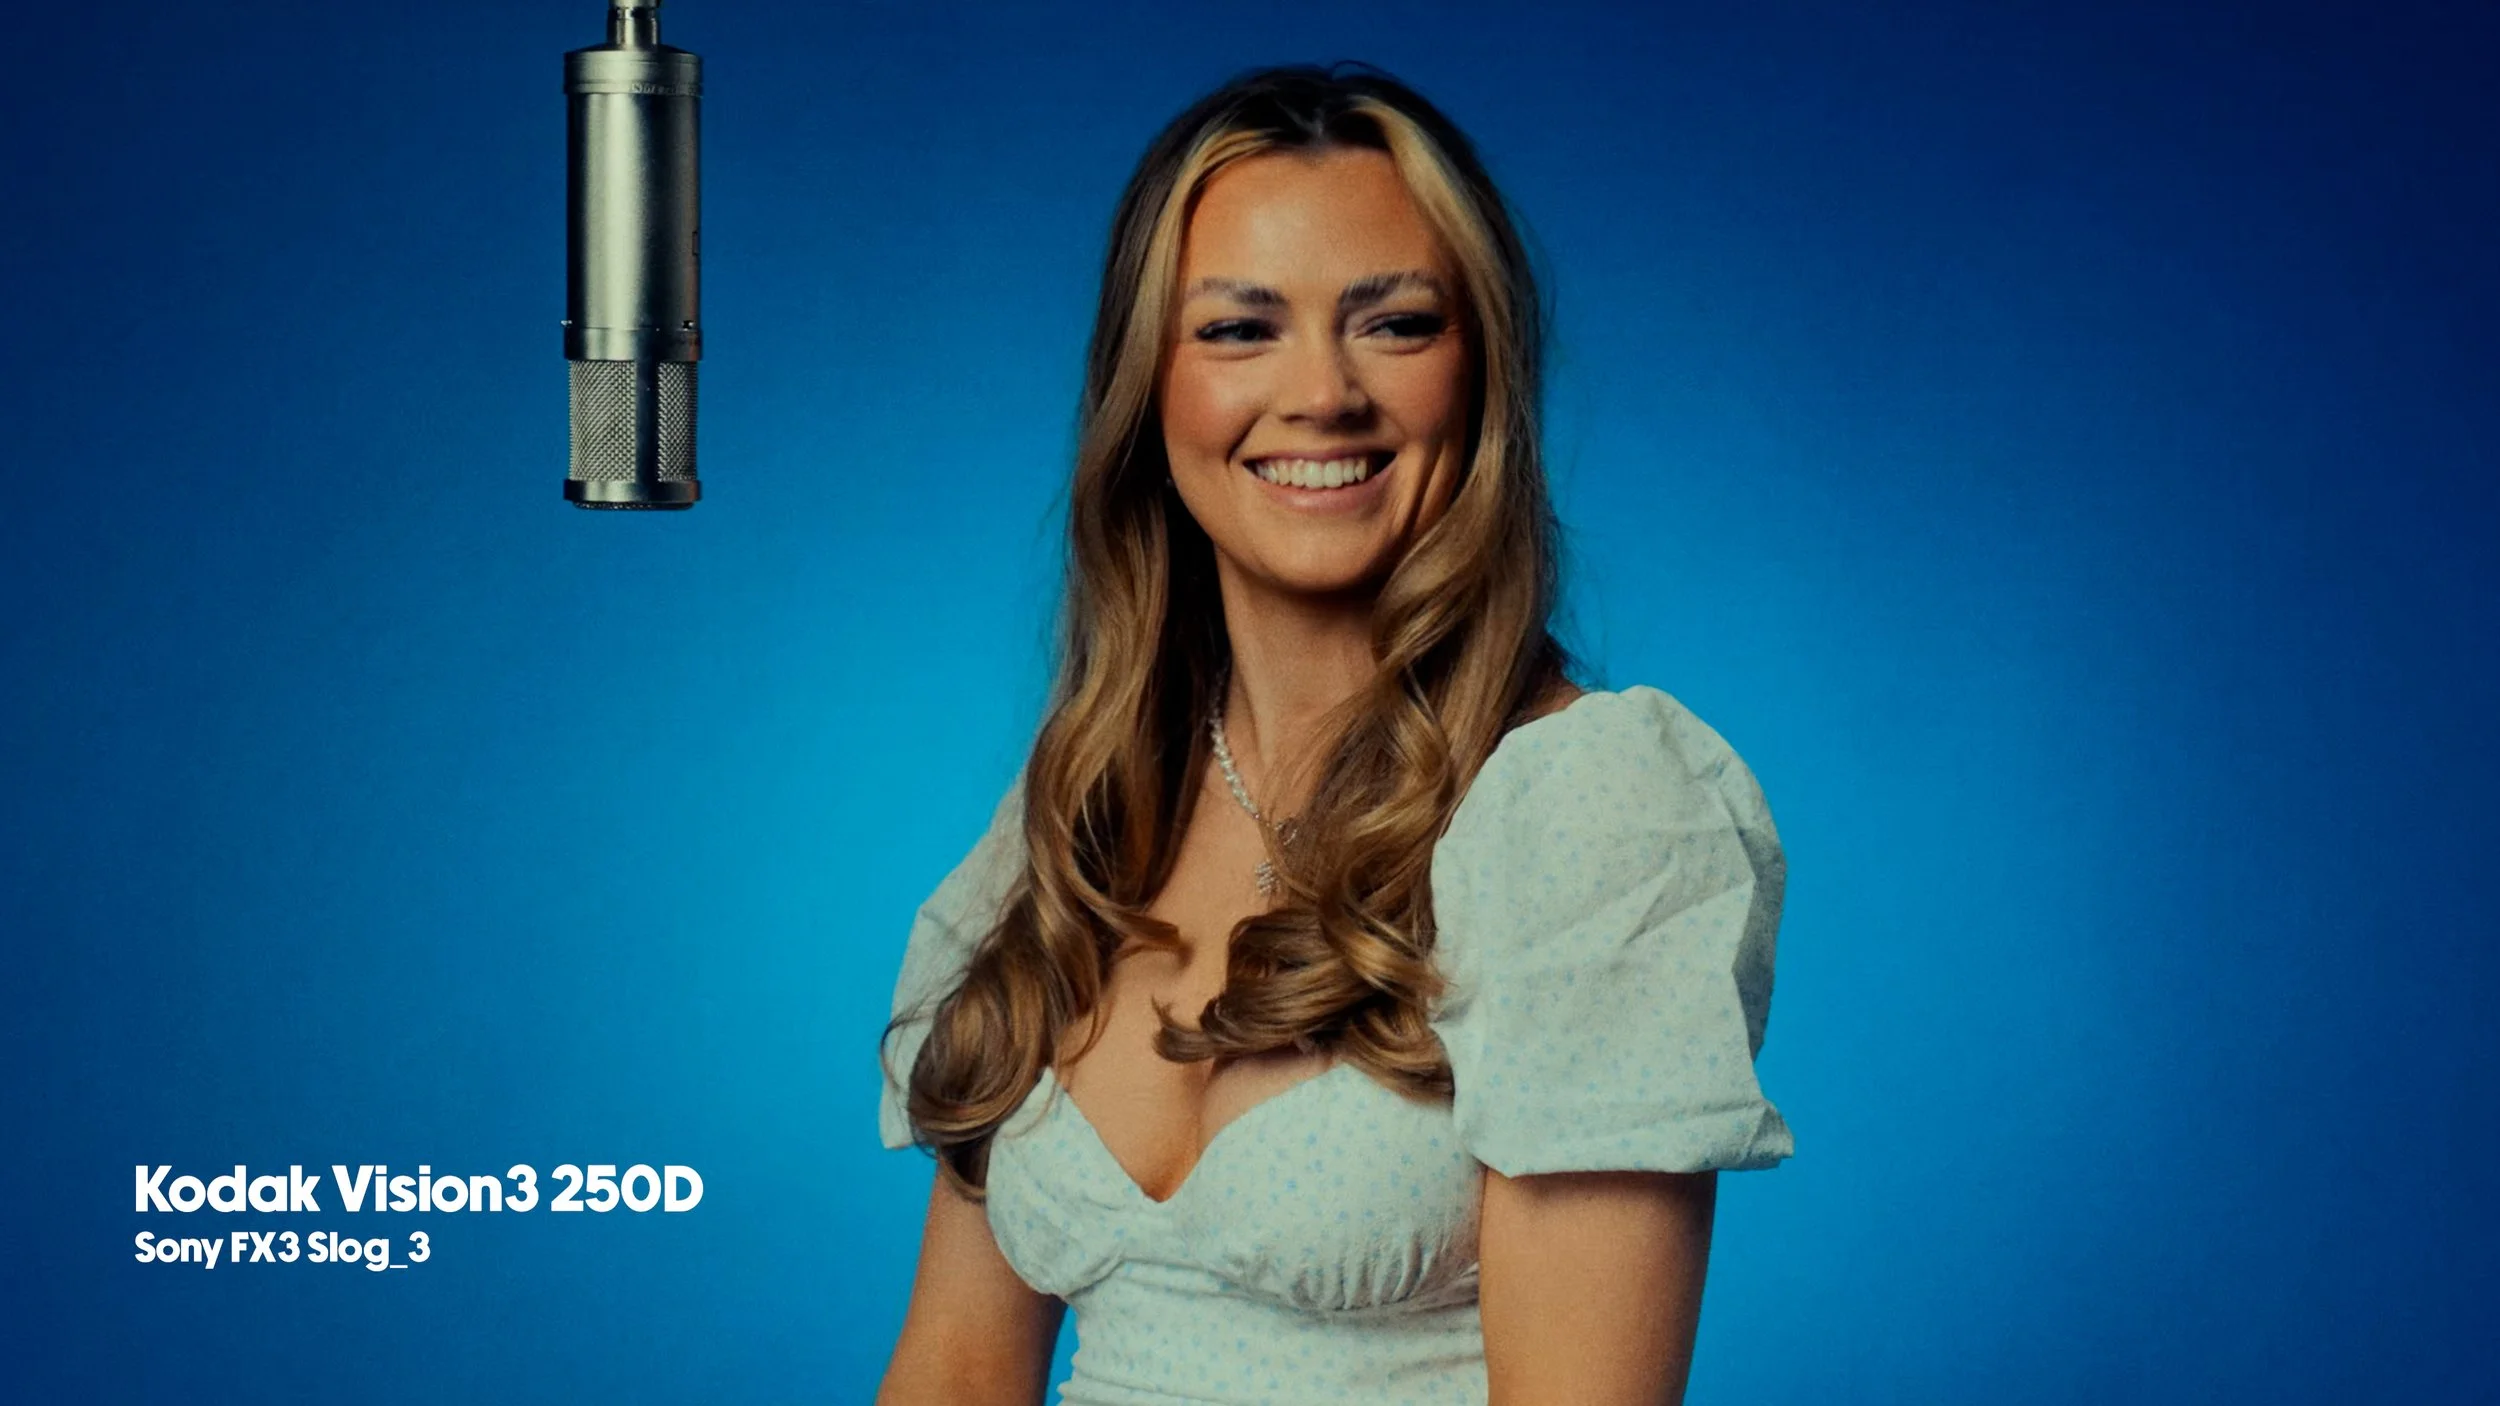
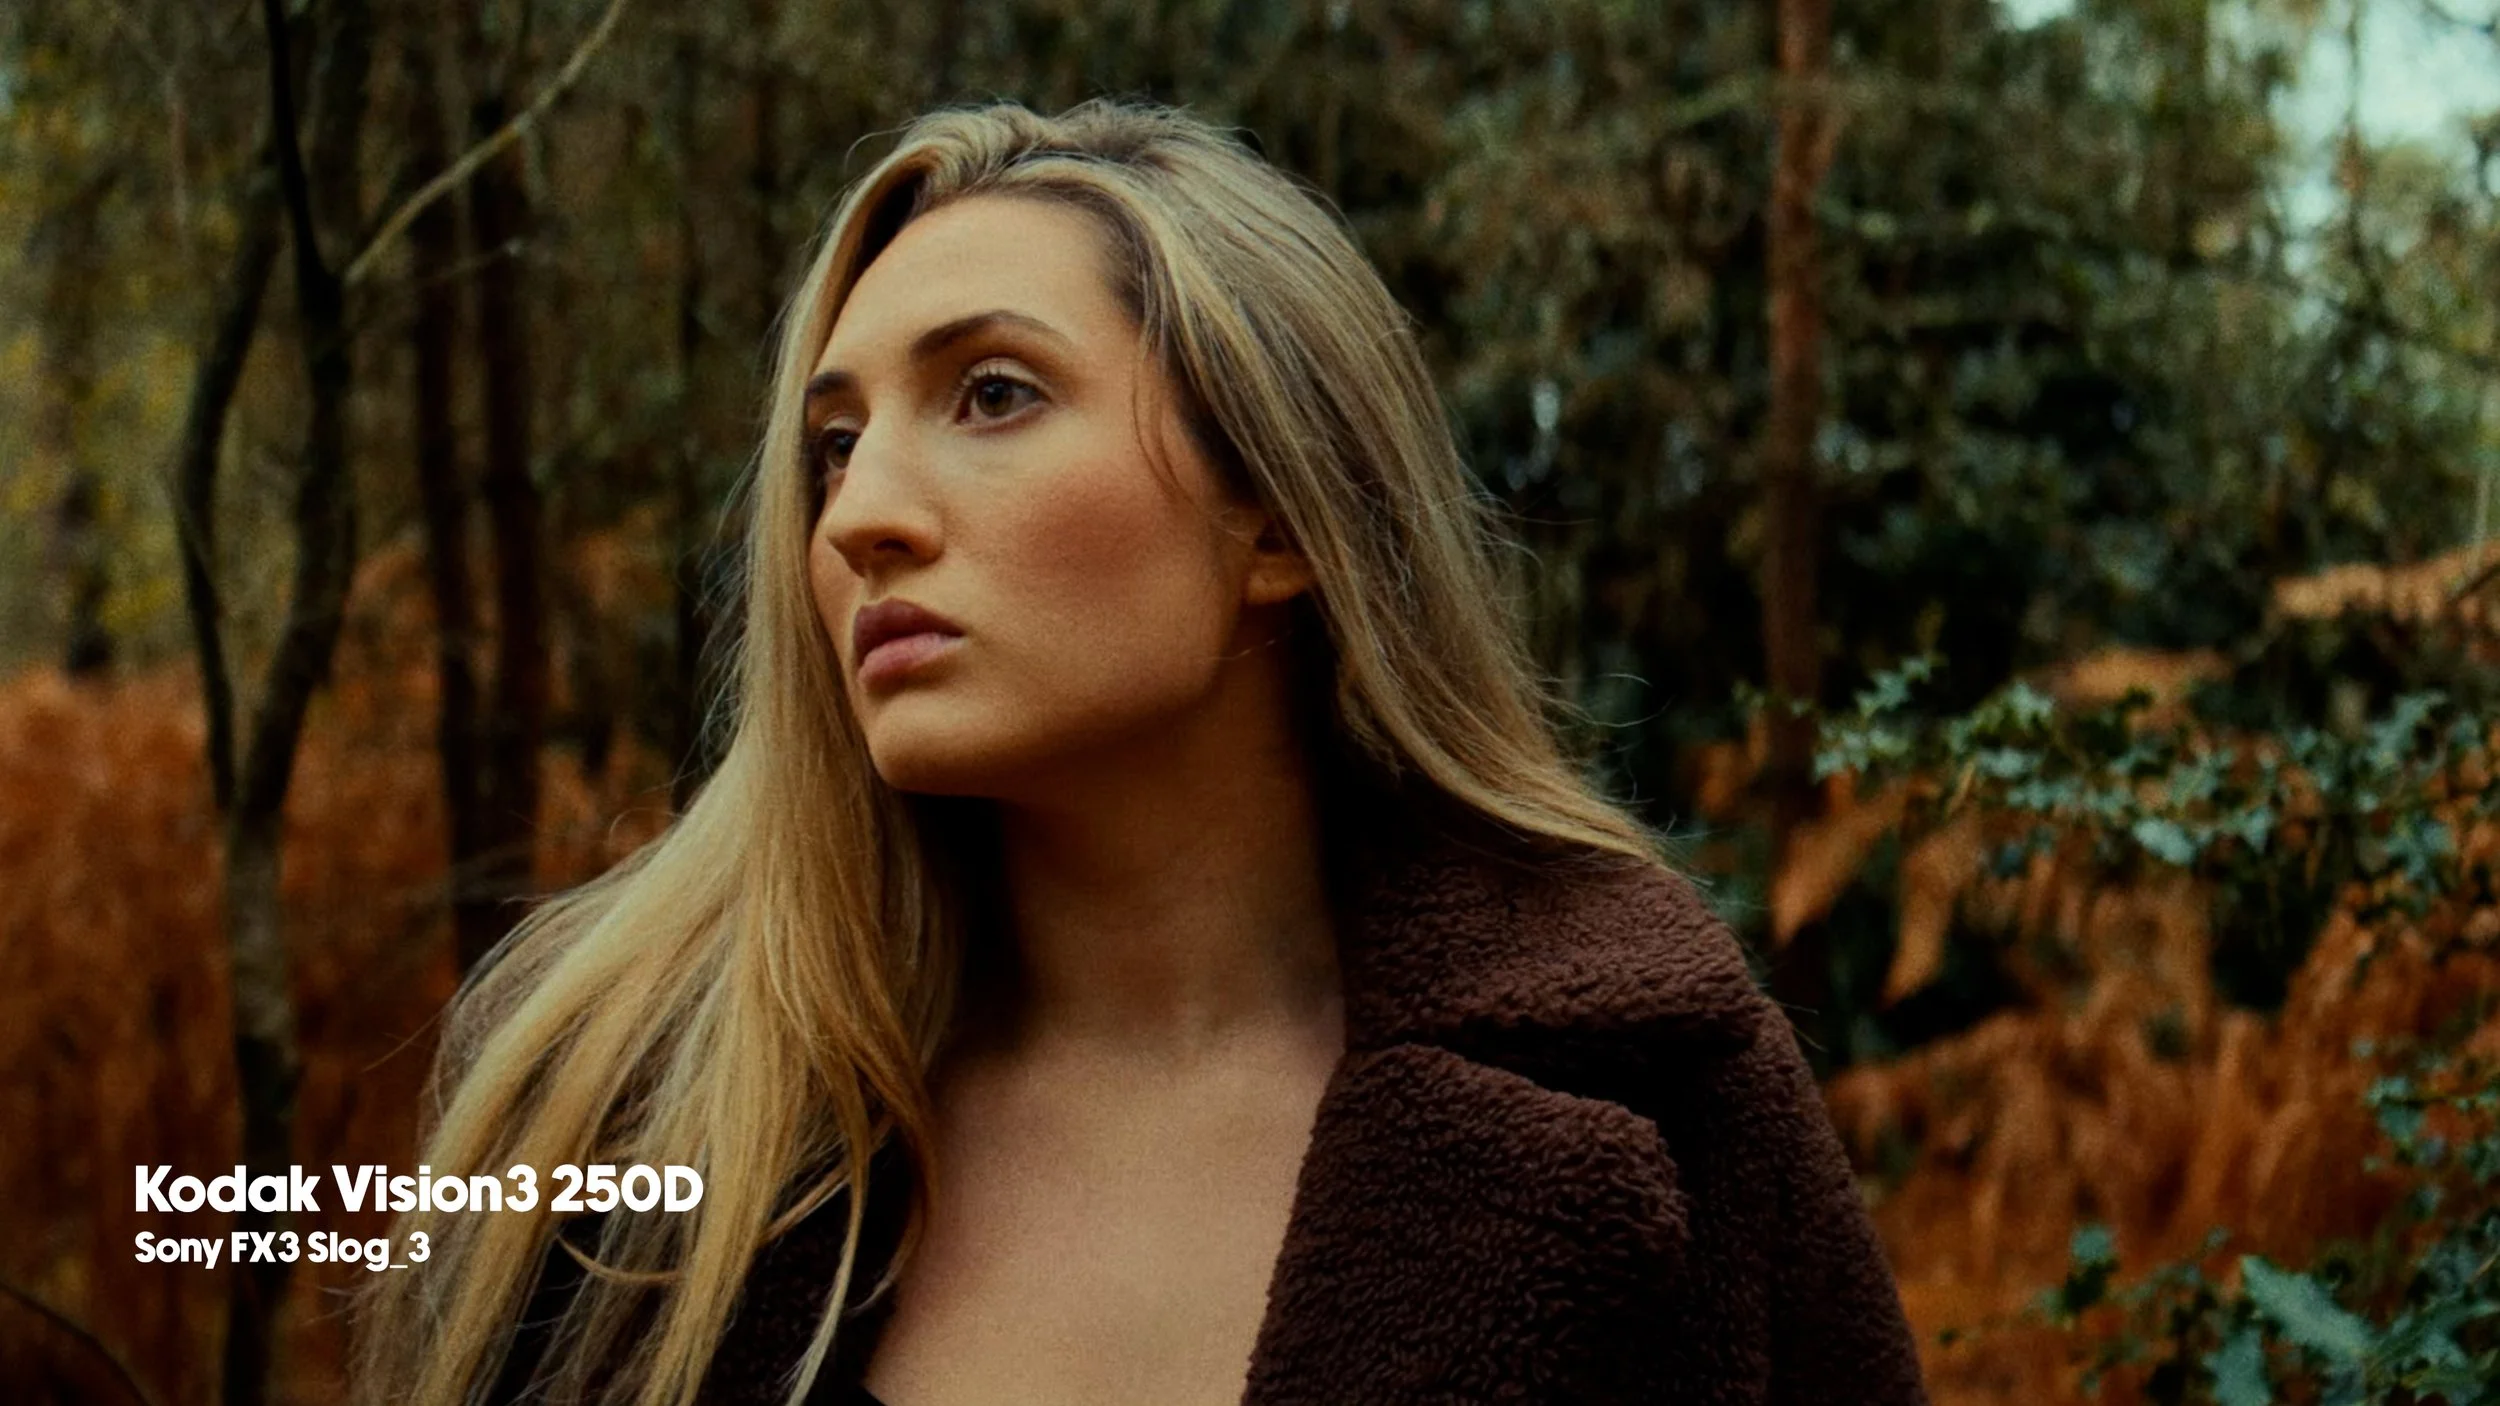
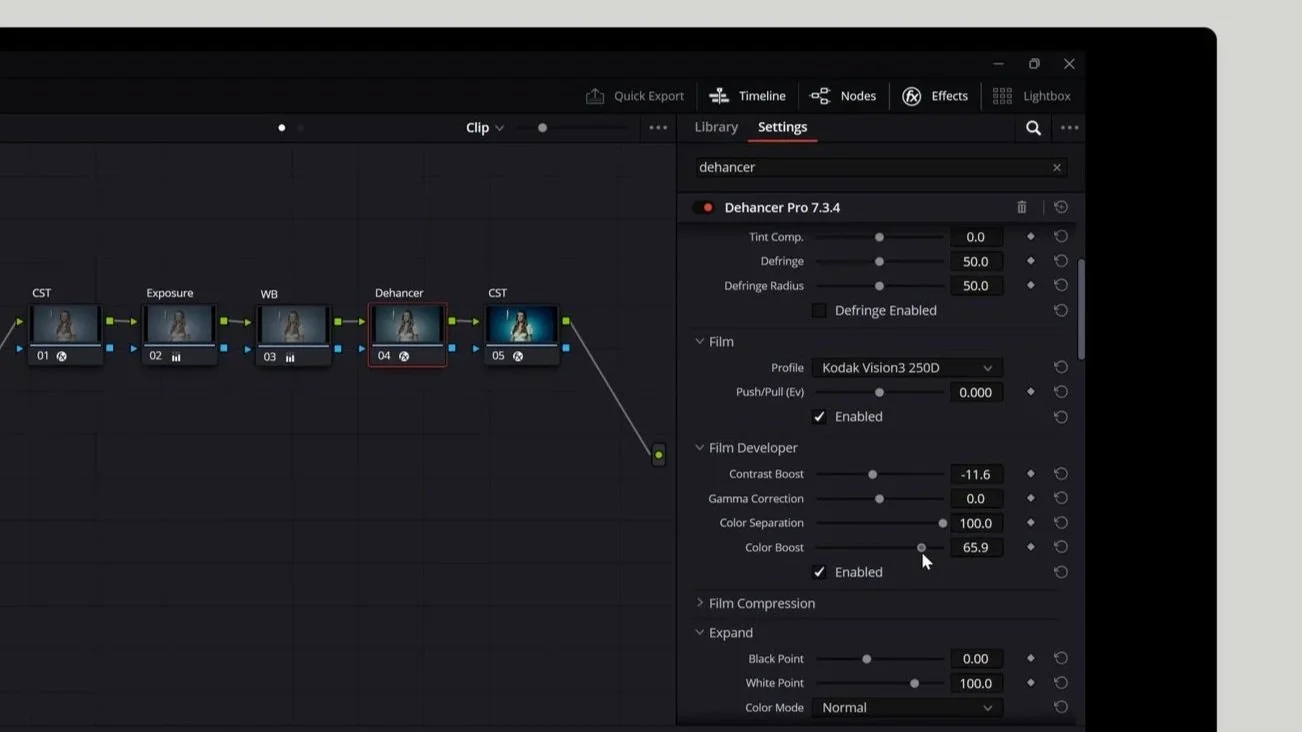
Kodak Vision3 250D
Film has something digital often doesn’t — imperfection.
It breathes. It glows. It reacts to light in a way that feels tangible.
When we chase that film look, we’re really chasing authenticity — something human and emotional. That’s why tools like Dehancer are so powerful. They don’t just color-grade your footage; they make it feel real again.
Dehancer Plugin
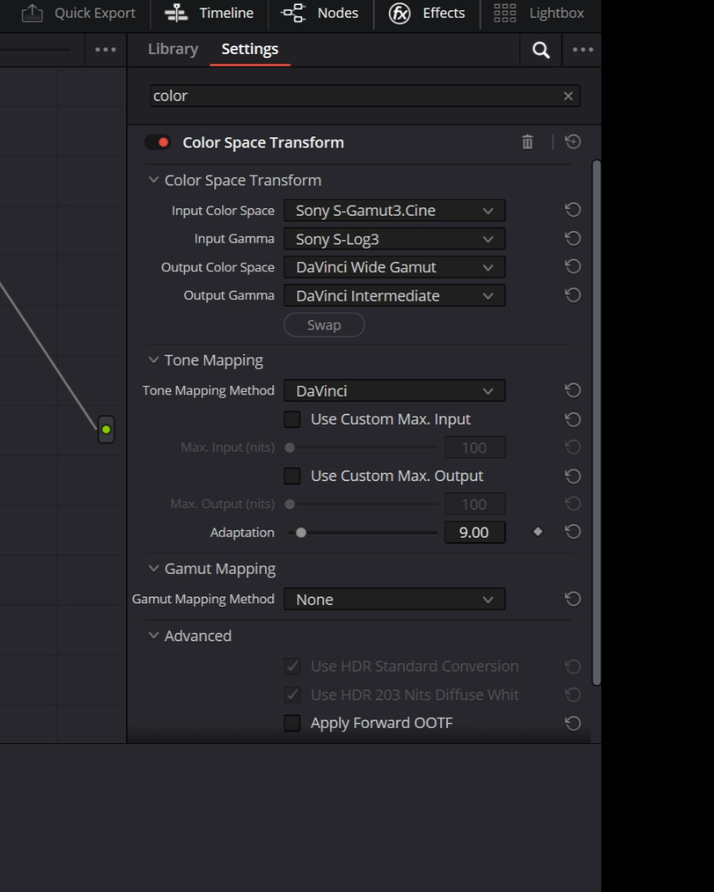
⚙️ Step 1: Set Up Color Management in DaVinci Resolve
Before you start grading, it’s important to make sure your color management is set up correctly.
Go to Project Settings → Color Management
Set the color science to DaVinci YRGB Color Managed
Choose DaVinci Wide Gamut Intermediate as your timeline color space
For output, use Rec.709A on a Mac, or Rec.709 Gamma 2.4 on Windows
This setup gives you the widest color range possible and ensures your footage looks consistent from start to finish.

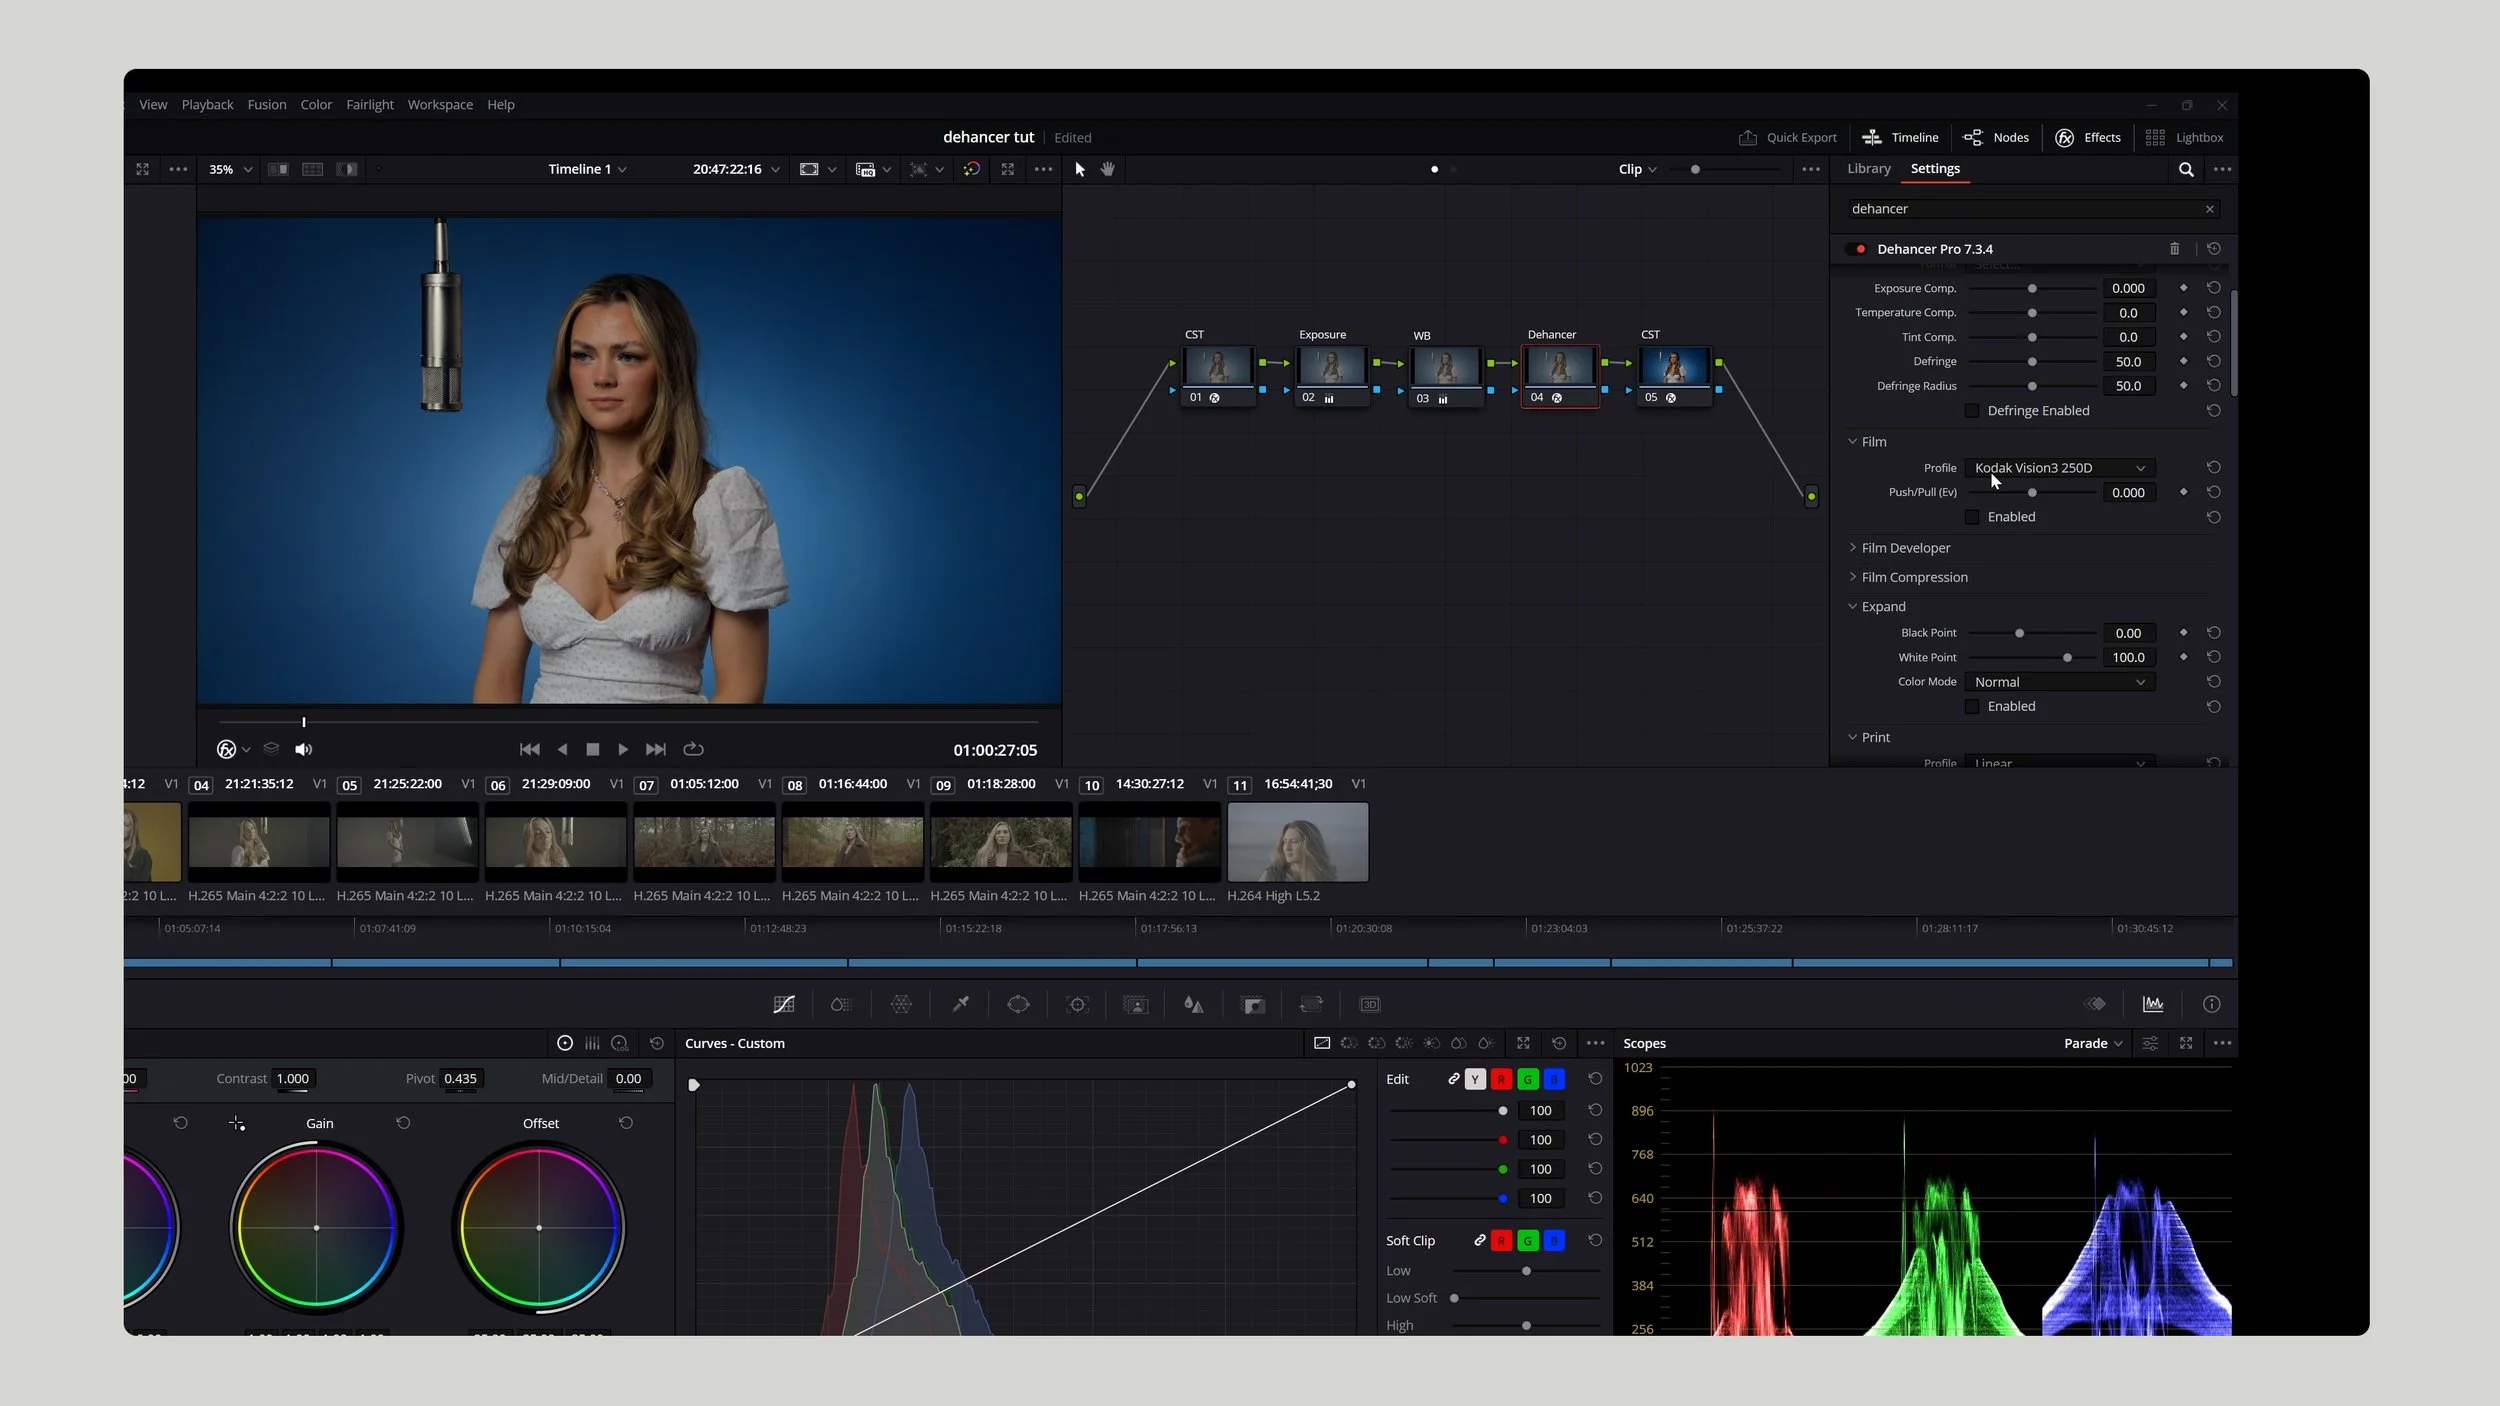
🌈 Step 2: Create a Simple Node Structure
You don’t need a complex 20-node setup to get great results.
Here’s a clean, five-node layout that keeps your workflow easy to manage:
Color Space Transform (CST) – from your camera’s log profile into DaVinci Wide Gamut
Exposure
White Balance
Dehancer Plugin
Color Space Transform – back to Rec.709
This structure lets you work flexibly, while Dehancer handles most of the heavy lifting.
💡 Step 3: Correct Exposure and White Balance
Start simple. If your footage feels dark, gently raise the gain.
Then warm up the temperature slightly for a natural skin tone.
These small tweaks make a huge difference before you start applying any film emulation.
🎬 Step 4: Add the Dehancer Plugin
Now for the fun part — film emulation.
Drop Dehancer onto your film node.
Scroll down and select Disable All Tools — this gives you a clean slate.
Under Film Stock, choose a look that suits your project.
I personally love Kodak Vision3 250D for its warm, contrasty tones.
Under Print, try Kodak 2383 for rich color and a smooth highlight roll-off.
Within seconds, your digital image will start to feel cinematic.
🎨 Step 5: Adjust Film Developer & Compression
Dehancer’s Film Developer tools help refine your tone and contrast:
Lower Contrast slightly
Boost Color Boost to around 70 to bring back life and saturation
Enable Film Compression to smooth out highlights and mimic real film response
These subtle adjustments create that soft, filmic roll-off that digital sensors usually lack.
🎞️ Step 6: Use the Color Head for Split Toning
The Color Head section in Dehancer acts like built-in split toning:
Cool down your shadows slightly
Warm up your midtones for skin and ambient light
Keep highlights neutral

This creates a cinematic color separation that feels balanced and organic — no LUTs required.
🧡 Step 7: Add Film Grain, Halation & Bloom
This is where Dehancer really shines.
These effects add the texture and imperfection that make footage feel like film.
Film Grain: Try 35mm ISO 50 for a subtle, fine texture
Halation: Adds that soft red glow around bright edges — a key part of the film look
Bloom: Wraps light around your subject, creating dreamy highlights
Tip: Keep these effects subtle. If you notice them too much, dial them back slightly.
📽️ Step 8: Compare Before & After
Here’s where you’ll really see the magic.
Before: flat, digital, clinical
After: rich, textured, cinematic
The difference isn’t just visual — it’s emotional.
The footage now feels like something real, something you could almost touch.
🔗 Try Dehancer Yourself
If you want to try Dehancer in your own DaVinci Resolve projects, you can grab it via the link below.
Use my code GIANTKILLER10 for 10% off your subscription.
This post isn’t sponsored — it’s an honest review of a plugin that genuinely delivers that nostalgic, film-like look.
🧠 Final Thoughts

Dehancer plugin
Digital cameras give us power, precision, and flexibility — but film gives us emotion.
Dehancer bridges that gap beautifully, letting you blend both worlds: the convenience of digital with the soul of film.
Whether you’re grading a short film, a wedding, or a YouTube project, Dehancer can help you craft visuals that connect — not just impress.
Graded using DEHANCER Kodak Ektachrome 100